

Lists the Printers ![]()
- Select printer’s Printer name, ID or select
![]() and Modify to open the Printer properties page.
and Modify to open the Printer properties page. - Select the printer’s number (2) of Queues
![]() or select
or select ![]() and Queues to toggle the view of print queues.
and Queues to toggle the view of print queues. - Select individual printers and select Modify at the bottom of the screen. Select the check box at the top of the list to select all printers.
- Select Refresh
![]() to refresh the list.
to refresh the list. - Select
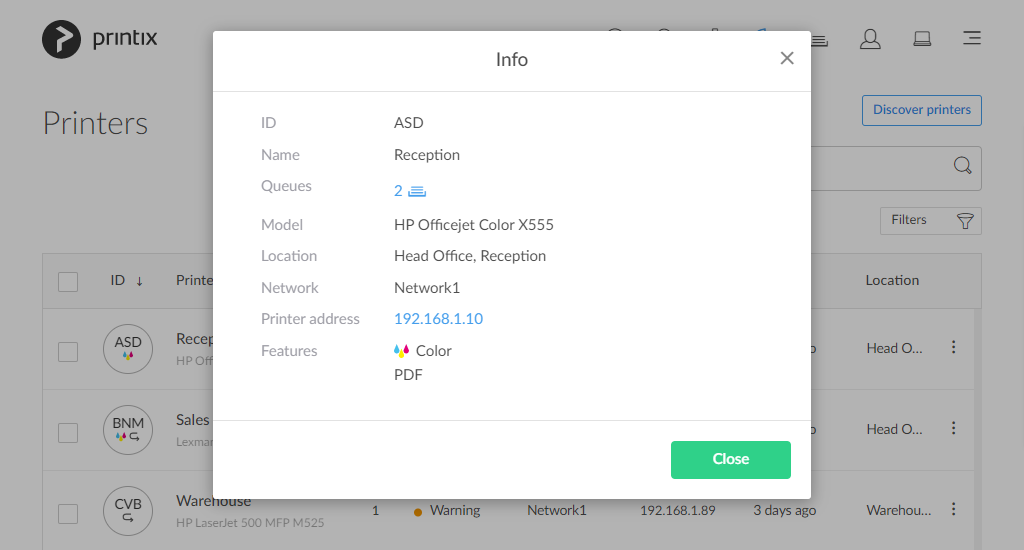
![]() and Info to see information about the printer:
and Info to see information about the printer:
- ID, Name, Queues, Model, and Location.
- Network. The network the printer is on.
- Printer address. Select this to open the printer’s web page.
- Features. Color
![]() printing, 2-sided
printing, 2-sided ![]() printing, and PDF printing.
printing, and PDF printing.
View mode
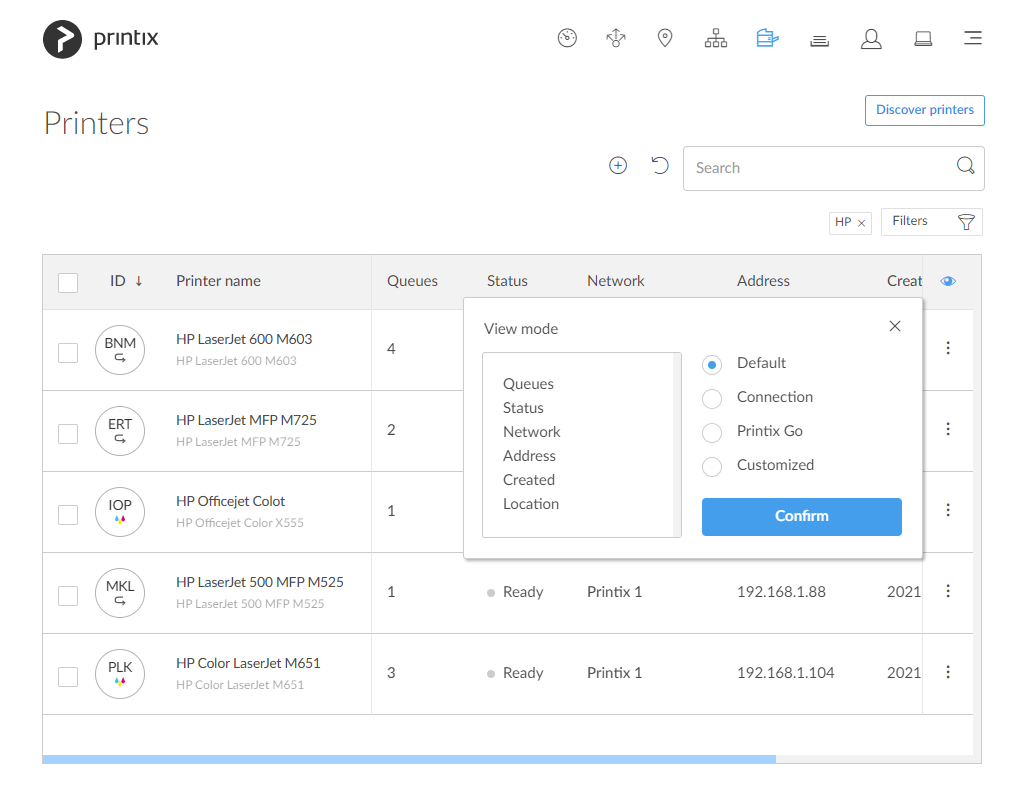
Select ![]() View mode to control what printer information should be shown. The ID and Printer name columns are always shown.
View mode to control what printer information should be shown. The ID and Printer name columns are always shown.
- Default – An overview of printers, their status and location. Columns:
- Queues, Status, Network, Address, Created, and Location.
- Connection – Useful if you are using SNMP settings and different protocols. Columns:
- Status, Network, Address, MAC address, SNMP configuration, and Protocol.
- Printix Go – Useful for managing Printix Go on your printers. Columns:
- Status, Installation, Vendor, Go version, Go configuration, and Sign in profile.
- Customized – Build you own customized view mode with the printer information you select.
How to view print queues
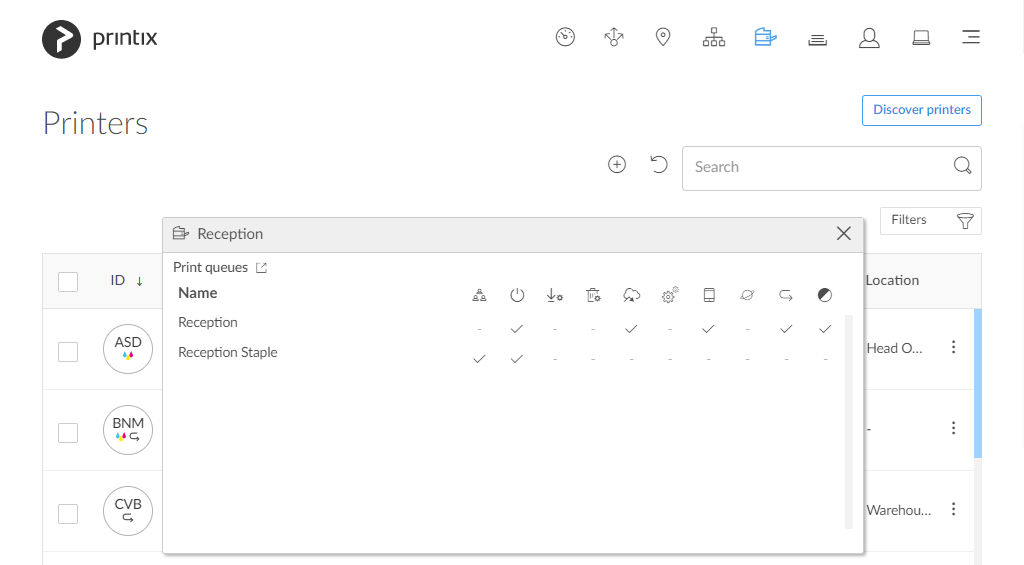
- Select the printer’s number (2) of Queues
![]() or select
or select ![]() and Queues to toggle the view of print queues.
and Queues to toggle the view of print queues. - Select Print queues
![]() to open the Print queues tab to Create, Modify or Delete print queues.
to open the Print queues tab to Create, Modify or Delete print queues. - Select Name (Reception) to open the Print queue properties page.
Add printer
- Select Add printer
![]() to add a printer.
to add a printer.
Other ways to add printers:
- Select Discover printers to add printers.
- Select Unregistered printers to work with printers that failed to register.

Search
- Select Search
![]()
- Enter printer ID, name, location or address.
Uppercase and lowercase letters are treated the same.
Filters
- Select Filters.
- Select Network to filter by this.
- Select Network type to filter by this.
- Company (Same as if no filter is selected)
- Home office
- Select Created to see printers added within the previous 3, 6, 12 or 24 hours.
- Select Printers with Go to filter by this.
- Select Outdated Go version to filter by this and determine which printers needs to have Printix Go updated.
- Select Go configurations to filter by this.
- Select Sign in profiles to filter by this.
Sort by
- Select item to sort by this.
- Select item again to toggle sort order:
![]() and
and ![]()
- Select ID to sort by printer ID.
- Select Printer name to sort by printer name.
- Select Created to sort printers by the date they were registered.
- Select Location to sort by printer location.
Status

- To see status details select the status icon:
![]() Ready
Ready
![]() Warning
Warning
![]() Error
Error
![]() Printer is not monitored or not responding – the status text is the last know status of the printer.
Printer is not monitored or not responding – the status text is the last know status of the printer.
- Select Network (Network1) to open Network properties page.
- Select Computer (COMPIX) to see Computer properties page.
- Select Printer (ASD) icon to see Printer properties page.
- See Toner levels in percentage (See: Disclaimer).
- Optionally, select Refresh
![]() to get the latest status.
to get the latest status. - Optionally select the Cloud
![]() / Network
/ Network ![]() communication status icon.
communication status icon.
![]()
- It will show Monitored by and the name of the computer (COMPIX) that is monitoring the printer (ASD).
- If there is no computer online to monitor the printer, it will show Printer is not monitored.

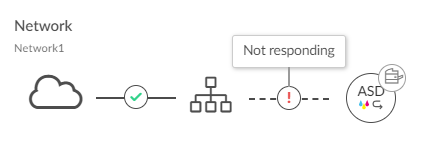
- Optionally, select the Network
![]() / Printer
/ Printer ![]() communication status icon.
communication status icon.
![]()
- It will show OK if communication is working.
- Not responding is shown if the printer is disconnected or powered off.
- Missing printer information is shown if the SNMP configuration is wrong.
- This is not a printer is shown if the entered address does not point to a printer.
Delete printer
- To delete a printer, select
![]() and Delete.
and Delete.
- Before deleting a Ricoh printer, Printix Go must be uninstalled, otherwise, you might see an error message when you next use a Print or Capture workflow on the printer.
- Select the printer(s) and select Delete
![]() .
. - Select the check box at the top of the list to select all printers.
Post your comment on this topic.