

To get here:
- Open the Print queues page or the Printers page to view the print queues.
- Select a print queue.
On the Setup ![]() tab you can modify the properties of the print queue.
tab you can modify the properties of the print queue.
Additional tabs:
Modify properties for multiple print queues
- On the Print queues page select individual print queues and select Modify.
- Make your modifications.
- Select Save. The modified settings will be saved for the selected print queues.
Name
- Print queue name
The print queue name cannot contain the characters ‘\’ and ‘,’ and must unique for the printer. Uppercase and lowercase letters are treated the same. The Print queue name is what users will see on their computer and in Printix Client. If there is just one print queue for the printer we recommend you keep the Printer name and print queue name the same. However, if there are for example two active print queues, you should name them so users will both know the physical printer and be able to determine the difference in purpose of the print queues.
Example:- Printer name Reception has two queues with the Print queue names: Reception and Reception Staple.
- Reception is the general purpose and the one most frequently used of the two print queues.
- Reception Staple has a print driver configuration that will staple together sheets by default.
- Printer name
The name of the printer.
- Model
The model name of the printer.
Settings
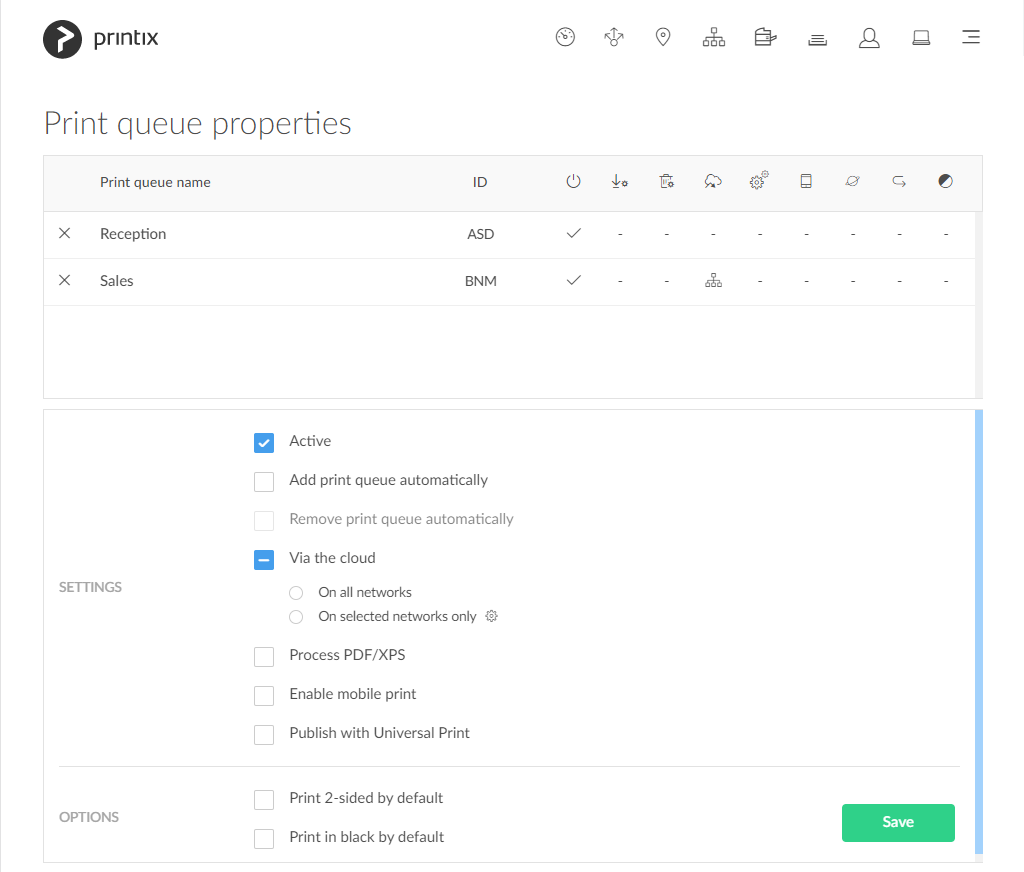
- Active
Check this to make the print queue Active so all users can use the print queue. Remember to print the printer’s ID sign and mount this at the printer. That way, users can easily identify the physical printer. Deactivating a print queue will not remove the print queue from computers, where it is already installed. To remove a print queue from computers, you should Delete the print queue.
- Add print queue automatically
Check this to add the print queue automatically on users’ computers running Printix Client. Only available if the print queue is Active. It may take a few minutes before the print queue is added.- Print queue is added automatically when the computer is on the same network as the printer network or if Via the cloud is checked for the print queue.
- Print queue is not added automatically while a computer is on an Unknown network.
- Print queue can also be added automatically based on users’ and computers’ group membership.
- Remove print queue automatically
Check this to remove the print queue automatically when the computer connects to another registered network. Not available if Via the cloud is checked.
- Via the cloud
Check this to allow users to print to the printer even though they are not on the same network as the printer.- On all networks
Print queue will be available via the cloud to all computers on all networks, including computers on unknown networks. Not available if Remove print queue automatically is checked. - On selected networks only
Print queue will be available via the cloud on the selected networks only. In a zero trust networks environment, use this to make the site’s printers (on their own printer network) available to only the computers on the site’s computer network. - See also: Modify Via the cloud for multiple print queues
- On all networks
- Process PDF/XPS
Normally, if the destination printer supports PDF, documents printed through Printix Chromebook and print anywhere documents, are sent as PDF data to the printer. Check Process PDF/XPS to force the PDF data to be processed according to the print queue’s print driver configuration and thereby finishing options. This will typically mean that the PDF print data is converted into for example PostScript or PCL in accordance with the print driver’s page description language (PDL). Printing will take longer time, compared to sending the PDF data directly to the printer, as the data need to be processed a second time and also the document is likely to increase in size.- If the destination printer supports XPS, XPS documents are sent as XPS data to the printer. Check Process PDF/XPS to force the XPS data to be processed according to the print queue’s print driver configuration. Please contact us if you want to have your Printix Client updated.
- See also: How to enable processing of PDF documents.
- Exempt from secure print
Select this to always have the documents print directly. Settings that would otherwise have the user release the documents are ignored. The following Secure print settings are ignored: All users must print securely, Selected groups must print securely, All users must print later by default and Selected groups must print later by default. The following Printix Client settings are also ignored: Preferred print method: Print later and Ask me to select print method at every print. Home office print queues are always Exempt from secure print.
- Enable mobile print
Check this to allow printing from Android and iOS/iPadOS phones and tablets to this print queue. Only available if Enable mobile print is checked on the Settings page’s Mobile print tab. On Android phones and tablets the print queue will be available regardless of the Android phone’s and tablet’s network connection (Wi-Fi or mobile network). On iOS/iPadOS phones and tablets on a Wi-Fi network the print queue will be broadcast as an AirPrint printer as follows:- A print queue will be broadcast on the printer’s network, if the network has Enable mobile print checked.
- A print queue, that has Via the cloud checked, will be broadcast on all networks that have Enable mobile print checked.
- A Printix Anywhere print queue will be broadcast on all networks that have Enable mobile print checked.
- Mobile printed anywhere documents can, unless the printer’s QR code or NFC tag is scanned, be released only to printers that has a print queue with Via the cloud checked.
- Publish with Universal Print
Check this to publish the print queue as a printer share in Universal Print. Only available if Integrate with Universal Print is enabled. Allow 1-2 minutes before the print queue is created as a printer share in Universal Print.- The name of the printer share will contain (UP), which is short for Universal Print. Example: Printix Anywhere (UP)
- If the print queue has Exclusive access checked in Printix Administrator, this information is carried through to Universal Print and reflected on the printer share’s Access control settings. Otherwise Allow access to everyone in my organization is checked for the printer share in Universal Print.
- See also: How to add secure print to Universal Print.
- Process PS
This is available only for Printix Anywhere print queues. If checked and you use PostScript print driver the PostScript to PDF conversion component (PS2PDF.dll) with resulting improved color and paper size control is used. If not checked, then no conversion to PDF happens.
Options
- Print 2-sided by default
Printing on both sides is a great way to save paper and benefit our environment. Has effect only if the printer support automatic printing on both sides. Users can still print on one side only, but will have to ask for this at each print. 2-sided printing is also known as: Duplex, Double-sided, and Front-and-back. This may not always work (See: Disclaimer).
- Print in black by default
Printing in black by default is a great way to save the additional cost of color printing. Has effect only if the printer support color. Users can still print in color, but will have to ask for this at each print. This may not always work (See: Disclaimer).
Post your comment on this topic.