
To get here:
- Select Menu
![]() , Sites
, Sites ![]()
About sites
Sites ![]() allows you to delegate the management of printers and print queues to the IT personnel at the local site. With the role as Site manager
allows you to delegate the management of printers and print queues to the IT personnel at the local site. With the role as Site manager ![]() they can do their job without having excess permissions to change global settings and printing at other sites.
they can do their job without having excess permissions to change global settings and printing at other sites.
- Site
- Concept of a site is based on networks.
- Multiple networks can belong to a site.
- A network can belong to one site.
- Printers (and thereby print queues) will belong to the site of their network.
- Site manager group
- A group (in Microsoft Entra ID or Google) whose users will get the role as Site manager for the site(s) the group is added to in Printix.
See also:
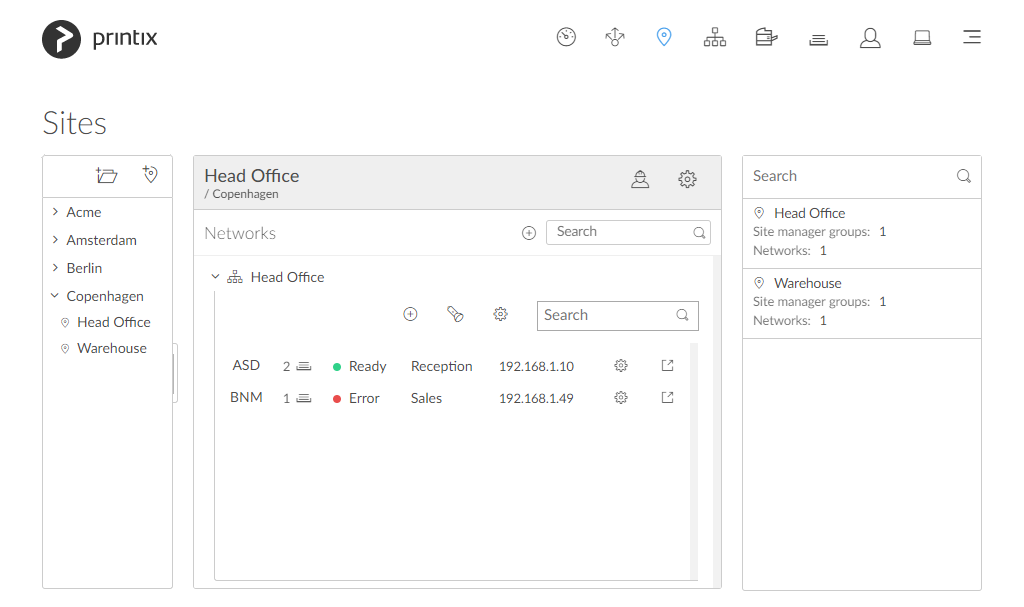
Panes
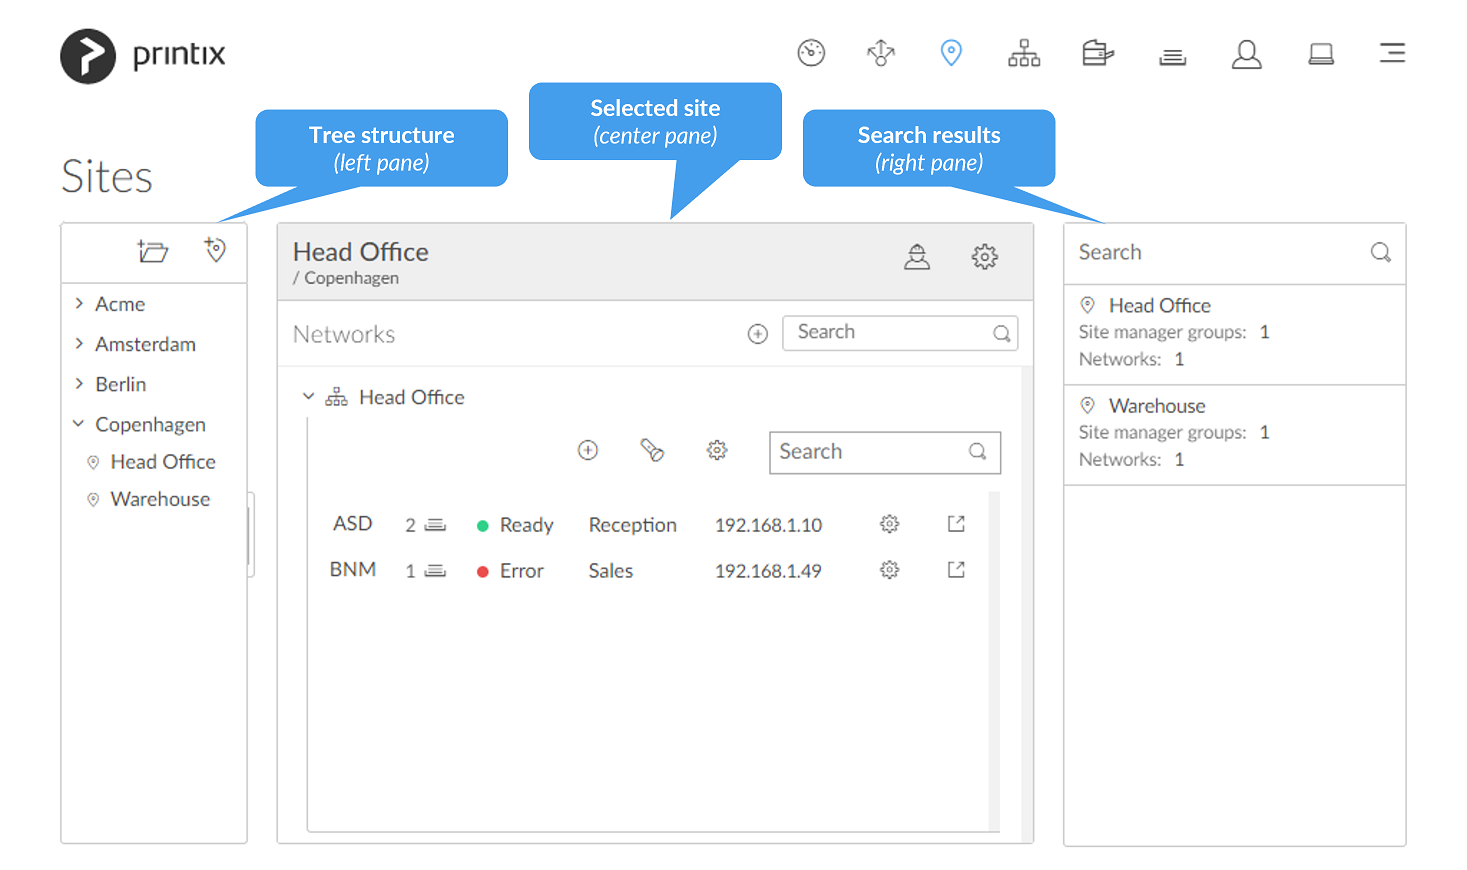
The page has these three panes:
- Tree structure (left pane)
- Tree structure of folders and sites.
- Organize your sites in a flat structure or into a folder structure based on for example geography, like: Region, Country, City, …
- Maximum 4 levels deep.
- Selected folder or Selected site (center pane)
- Search results (right pane)
- Sites matching the current Search criteria.
Tree structure (left pane)
Folders and sites that are directly managed by the site manager are displayed in bold.
- Select New folder
![]() to add a new folder.
to add a new folder. - Select a folder to open or close the folder and display information about the folder in the center pane.
- Right-click the folder to open Folder menu:
- Select Folder name (Copenhagen) to rename the folder.
- Select Site manager groups to see and remove the associated Site manager groups.
- Select New folder to add a new folder.
- Select Create site to create site.
- Select Add site manager groups to add Site manager groups.
- Select Delete folder to delete folder.
- Select Create site
![]() to create site.
to create site. - Select a site to open the site in the center pane.
- Right-click the site to open Site menu:
- Select Site name (Head Office) to rename the site.
- Select Site manager groups to see and remove the associated Site manager groups.
- Select Networks to see and remove networks associated to the site.
- Select Add site manager groups to add Site manager groups.
- Select Add networks to add networks.
- Select Delete site to delete site.
Selected folder (center pane)
Information about the selected folder.
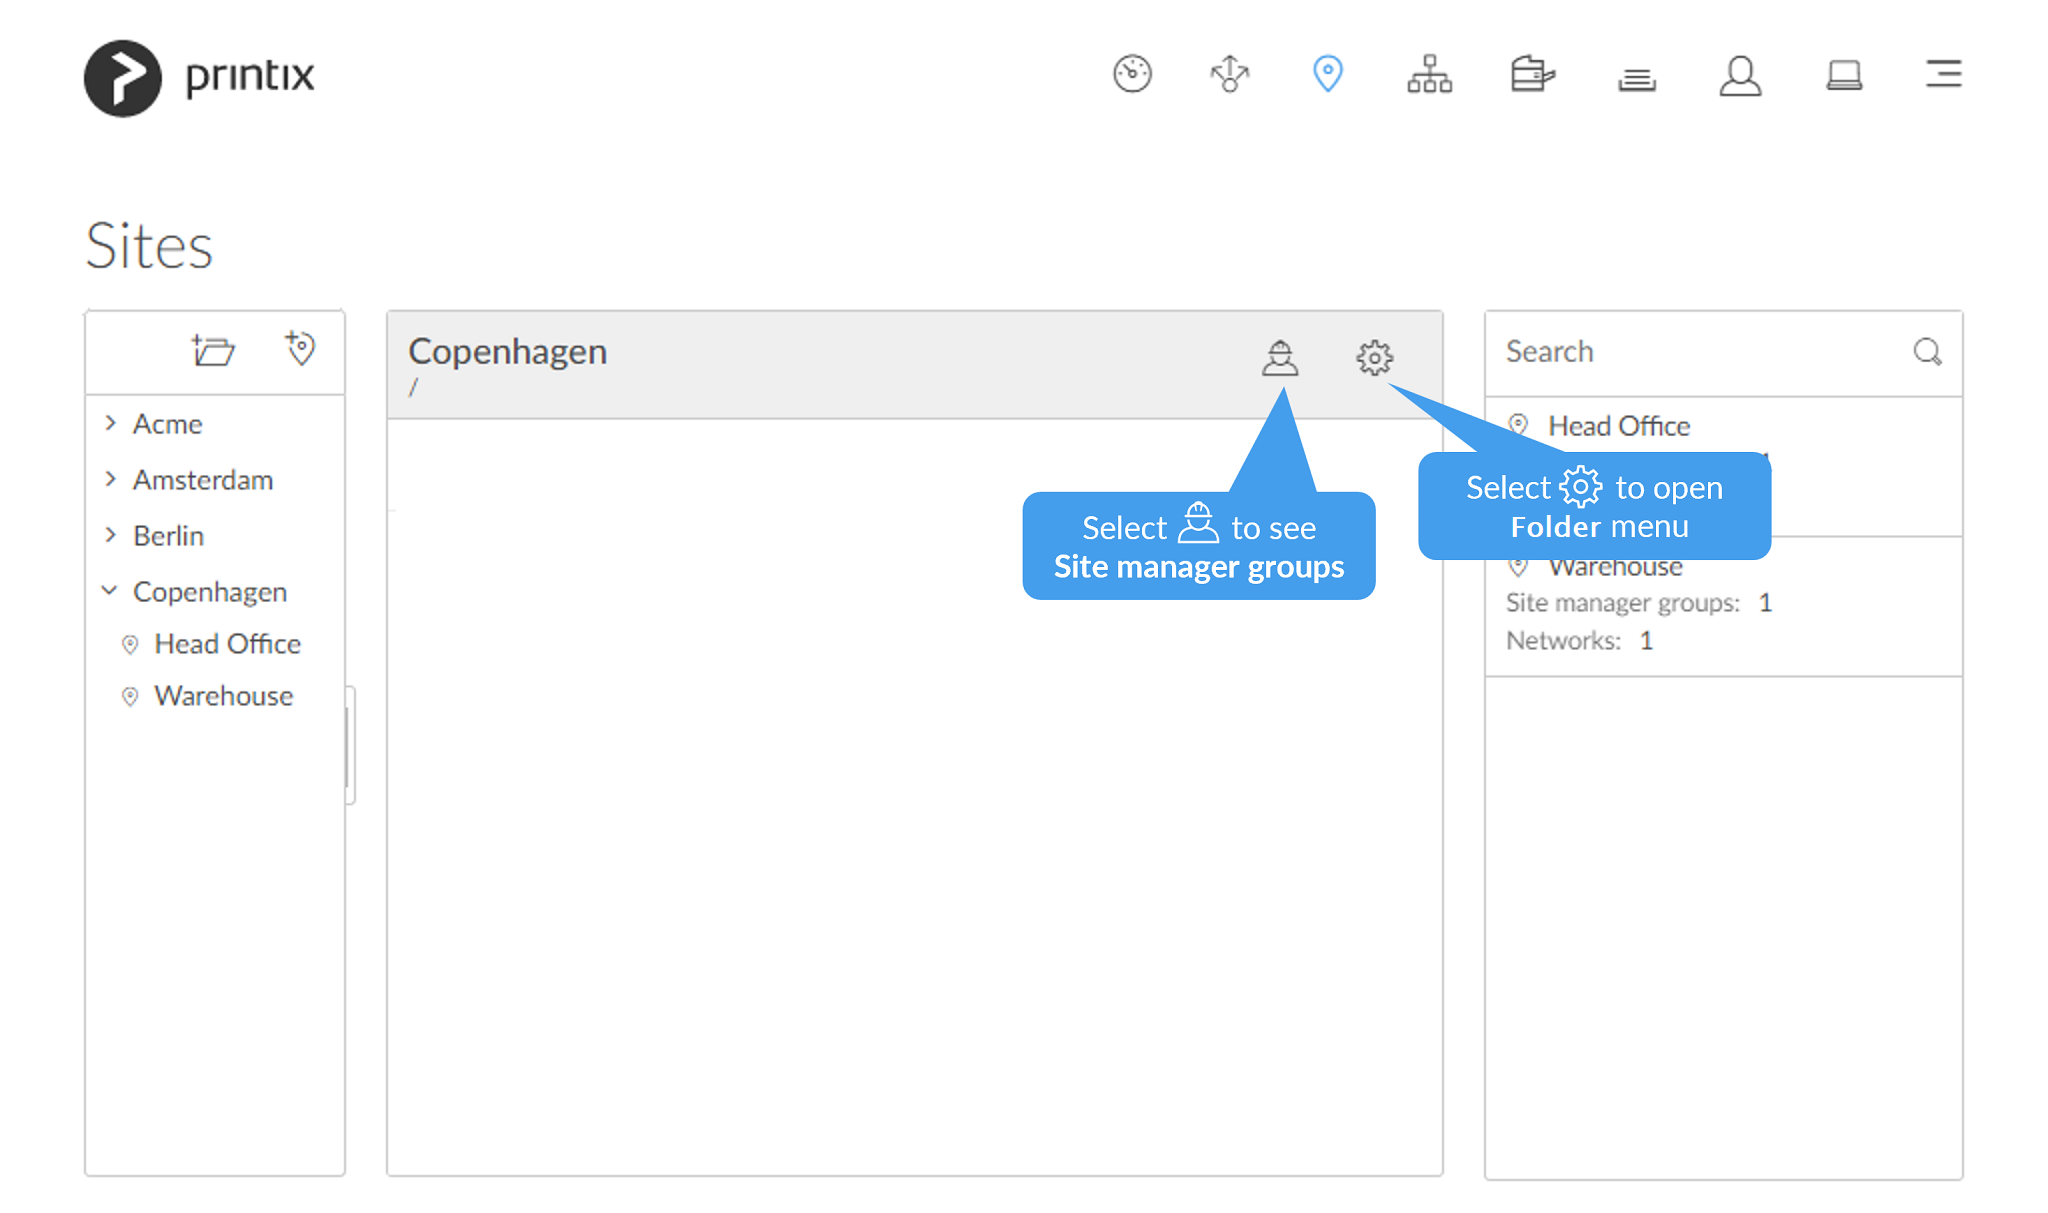
- Select Site manager groups
![]() to see the list of site manager groups currently assigned for the folder:
to see the list of site manager groups currently assigned for the folder:
- Select More
![]() and Remove
and Remove ![]() to remove a site manager group.
to remove a site manager group.
- Select More
- Select Folder setup
![]() to open the Folder
to open the Folder ![]() menu:
menu:
- Select Folder name to rename the folder.
- Select Site manager groups to see and remove the associated Site manager groups.
- Select New folder to add a new folder.
- Select Create site to create site.
- Select Add site manager groups to add Site manager groups.
- Select Delete folder to delete folder.
Selected site (center pane)
Information about the selected site, including networks and printers.
Site information
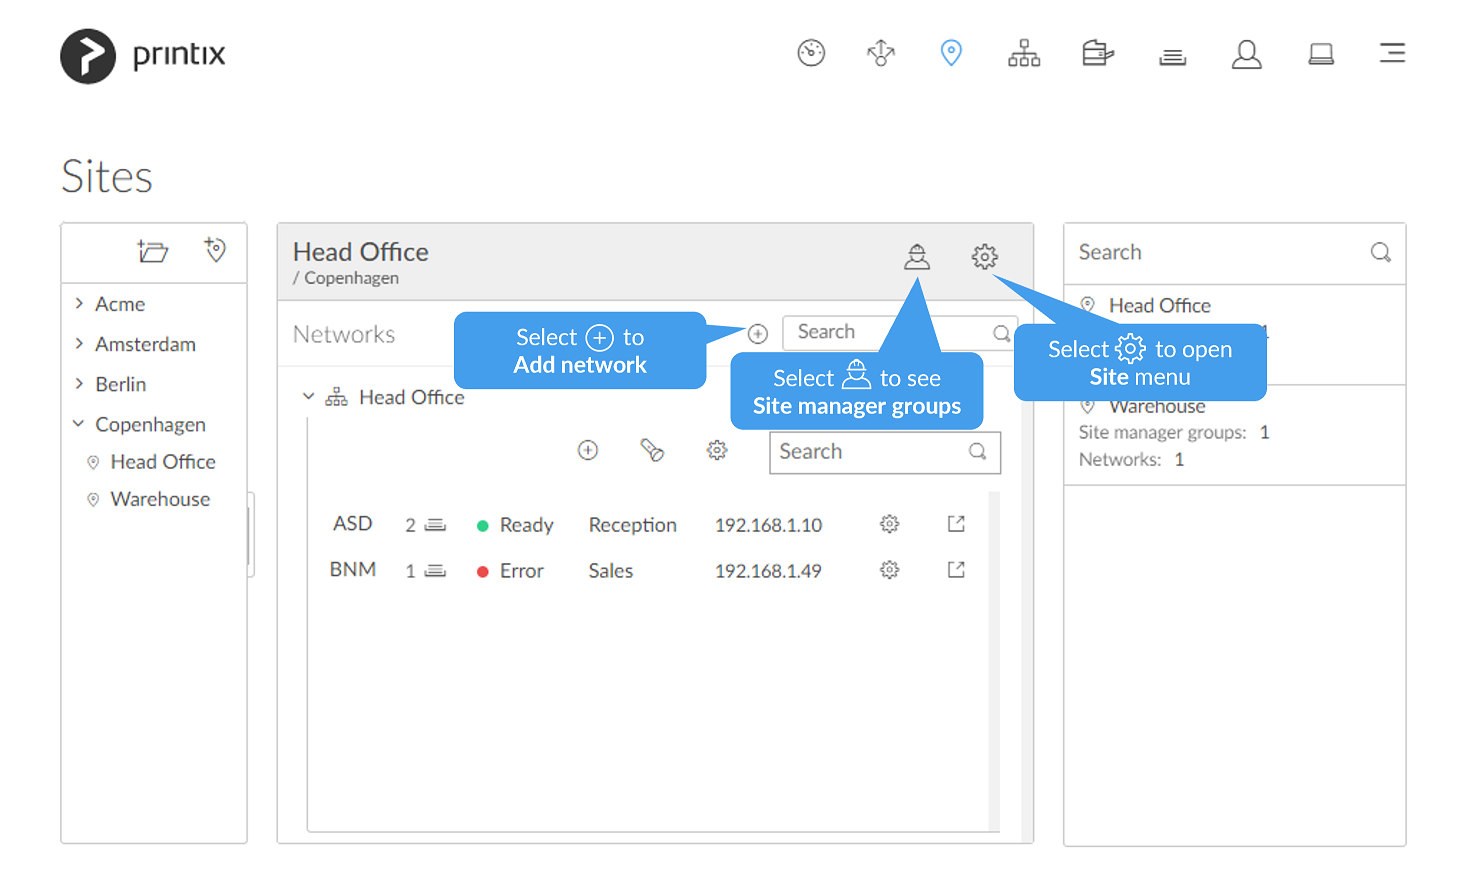
- Select Add network
![]() to open Add network
to open Add network ![]() menu:
menu:
- Select Add networks to add networks.
- Select Create new network to create a new network.
- Select Site name (Head Office) to rename the site.
- Select Site manager
![]() to see the list of Site manager groups for the site:
to see the list of Site manager groups for the site:
- Select More
![]() and Remove
and Remove ![]() to remove a site manager group.
to remove a site manager group.
- Select More
- Select Site setup
![]() to open the Site
to open the Site ![]() menu:
menu:
- Select Site name to rename the site.
- Select Site manager groups to see and remove the associated Site manager groups.
- Select Networks to see and remove networks associated to the site.
- Select Add site manager groups to add Site manager groups.
- Select Add networks to add networks.
- Select Delete site to delete site.
- Select Search
![]() to search for networks on the site.
to search for networks on the site.
Get started
The 4-step Get started wizard will guide you through the setup of the site.
- 1. Add network.
- 2. Add computer to network.
- 3. Discover printers.
- 4. Add site manager groups.
Networks added to the site

- Select Network name (Head Office) to open and close network.
- Select Add printer
![]() to add a printer.
to add a printer.
- Select Discover printers
![]() to add printers.
to add printers.
- Select Network setup
![]() to open Network
to open Network ![]() menu:
menu:
- Select Network name to rename the network.
- Select Settings to open Network settings dialog.
- Select Gateways to see list of Gateway IP and Gateway MAC addresses.
- Select Test network to test if communication to the networks’ gateways is working.
- Select Computers to see list of Computers that are on the network.
- Select Add printer to add a printer.
- Select Discover printers to add printers.
- Select Add gateway via computer and then select a computer that is on the network.
- Select Search
![]() to search for printers on the network.
to search for printers on the network.
Printers on the network
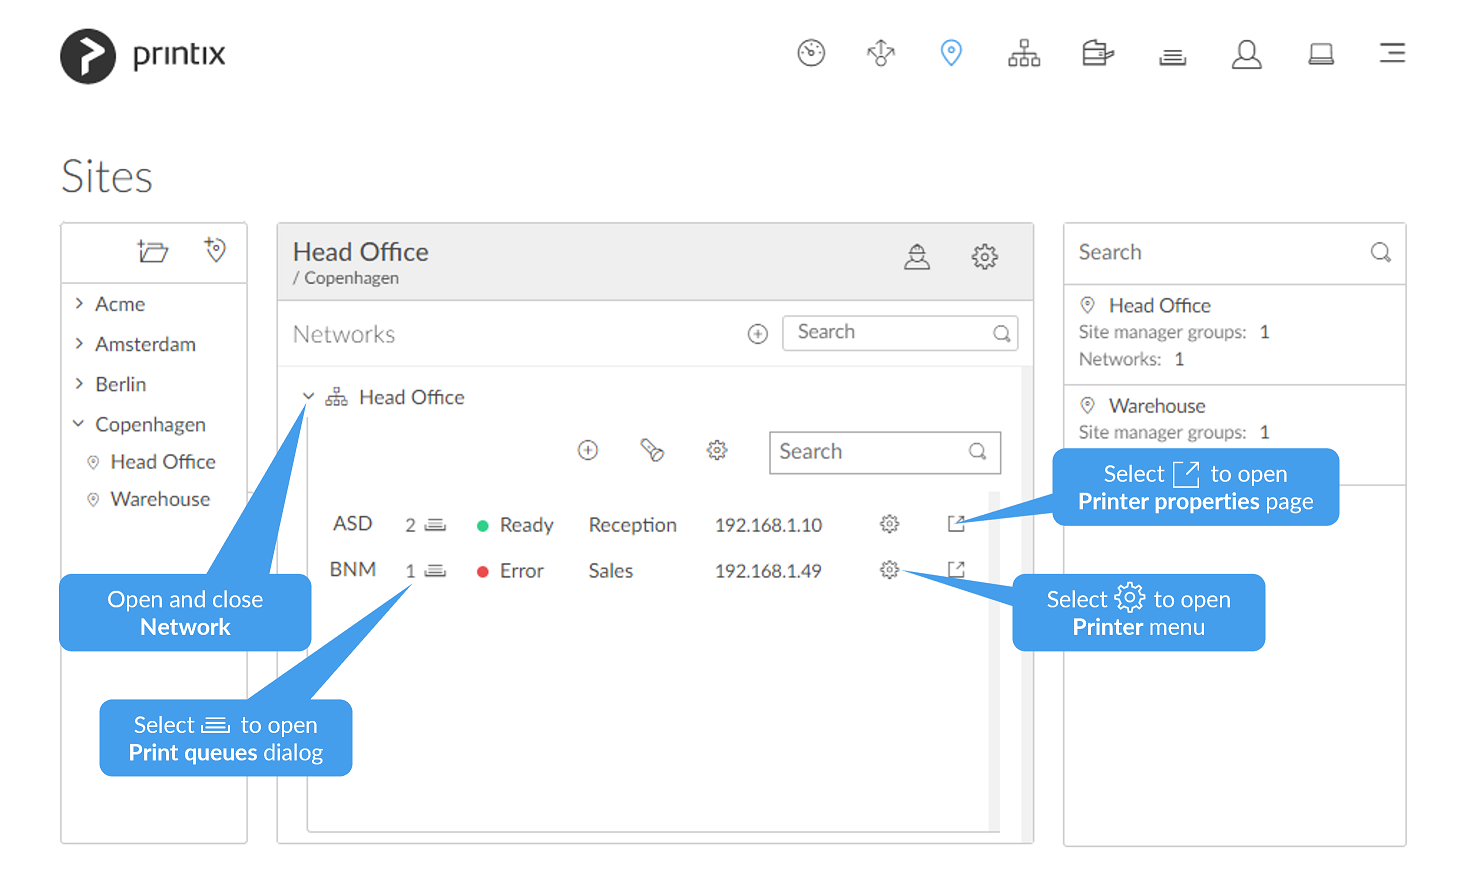
- Select ID (BNM) to open Printer settings dialog with Printer name, Model and Location.
- Select Print queue (1)
![]() to open Print queues dialog with list of print queues and their settings.
to open Print queues dialog with list of print queues and their settings. - Select Status (Error) to open Printer status dialog.
- Select Printer name (Sales) to open Printer settings dialog with Printer name, Model and Location.
- Select Printer address (192.168.1.49) to open Printer connection dialog with Printer address, MAC, Network and SNMP configuration.
- Select Printer setup
![]() to open Printer
to open Printer ![]() menu:
menu:
- Select Settings to open Printer settings dialog with Printer name, Model and Location.
- Select Connection to open Printer connection dialog with Printer address, MAC, Network and SNMP configuration.
- Select Print queues dialog to open Print queues dialog with list of print queues and their settings.
- Select Status to open Printer status dialog.
- Select Delete to delete printer.
- Select Redirect
![]() to open Printer properties page in a new tab.
to open Printer properties page in a new tab.
Unregistered printers on the network

- Select Printer
![]() to toggle between Unregistered printers and Printers
to toggle between Unregistered printers and Printers - Select Manual registration if the printer does not support SNMP.
- Select Redirect
![]() to open Printer issues page in a new tab.
to open Printer issues page in a new tab.
Search results (right pane)
- Select Search
![]() to search for site.
to search for site. - Enter site name.
Uppercase and lowercase letters are treated the same. - Select site to open the site in the center pane.
Post your comment on this topic.