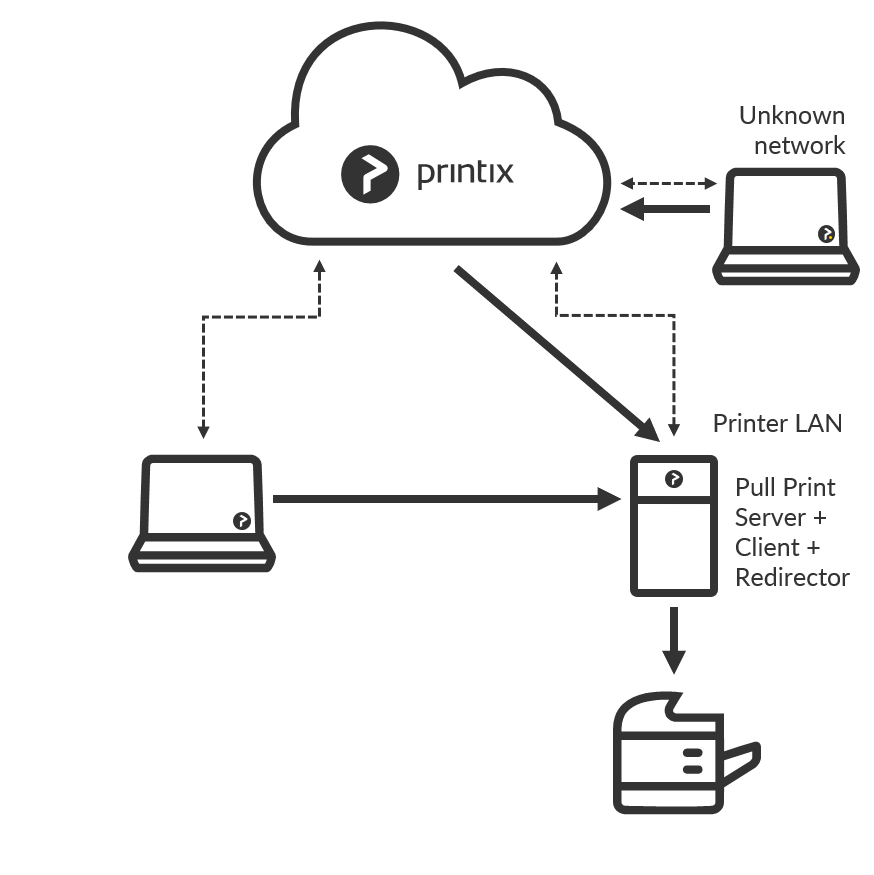
If you have a third-party Follow/Pull printing solution, you can still benefit from Printix. Users can continue using existing card readers to sign in and release documents from the enabled printers’ touchscreen control panel. Printix allows you to automatically install the Follow/Pull print queues on the users’ Windows or Mac computer. Optionally you can allow users to submit documents from home and while travelling.
- Install Printix Client and Printix Redirector on the (server or desktop) computer that has the Follow/Pull print queue installed.
- In Printix Administrator open the Printers
page.
- Select Add
- Select the Network of the computer that has the Printix Redirector and print queue installed.
- In Printer address type: \\servername\printqueuename
- The servername should be that of the server running Printix Redirector. Example: myserver.
- The printqueuename should be the Printer name of the Follow/Pull print queue (PullPrint).
- Select Add.
- If the printer does not appear in Printix Administrator, then look for it on the Unregistered printers page.
- By default the print name is set to the name of the driver used by the Follow/Pull print queue.
- The default print queue is set to the name of the driver used by the Follow/Pull print queue. If there is no print queue, then Create print queue.
- In Printix Administrator open the Print queue properties page of the virtual printer.
- Uncheck Active, until you are done testing the print queue.
- Check Exempt from secure print. Settings that would otherwise have the user release the documents in Printix are ignored and instead the user will only have to release the document in Kofax ControlSuite or their third-party Follow/Pull printing solutions.
- Optionally for each system (Windows, Windows 7 ×64, …)
Test printing
- On your computer, use Printix Client to add the printer. In Printix Client the administrators will see a star ★ after the printer ID if the print queue is not active. Example: ASD ★ Reception
- Print a document to the added printer.
- Verify the document ends up in the third-party printing solution, and you can release the document via the methods offered by the particular print management system.
- This may fail if the format of the username is not recognized.
- For the Printix Client running on the Pull Print Server, you may want to open Computer properties and check Act as print gateway, so documents printed via the cloud are sent to the Pull Print Server rather than via another computer on the network.
Make the printer available to everyone
- In Printix Administrator open the Print queue properties page of the virtual printer.
- Check Active, so all users can use the print queue.
- Optionally check Add print queue automatically.
- Optionally check Via the cloud to allow users to print to the Follow/Pull print queue even though they are not on the same network.
Troubleshooting
The added printer remains unregistered
The printer name is probably wrong. You can consult the Printix Redirector log file to see the printer names and copy the right one from the log file.
RESOLUTION:
- Restart the Printix Redirector service. A list of the print queues is written in the top of the log file after a restart.
- Open the log file: C:\ProgramData\printix.net\Printix Redirector\Logs\PrintixRedirector.log_
- In the log file search for getAllQueuesWin. For each print queue, there will be an entry like, this
Service, found queue: _printqueuename_, port: _port_- Identify the correct printqueuename and use that.
See also: How to see which print queues and ports are installed
Wrong format for network printer address (ip address or hostname)
Message appears if you try to modify the Printer address of a printer that was initially registered by IP address or hostname and thereby as a network printer.
RESOLUTION:
- To add a virtual printer you must add a new printer and from the very beginning give it a Printer address in the format \\servername\printqueuename
Wrong format for virtual printer address (\\servername\printqueuename)
Message appears if you try to modify the Printer address of a printer that was initially registered by \\servername\printqueuename and thereby as a virtual printer.
RESOLUTION:
- To add a network printer you must add a new printer and from the very beginning give it a Printer address in the form of an IP address or hostname.


Post your comment on this topic.