
Enable storage of pending documents in your secure cloud storage. That way, the user’s computer does not need to be online to release print later and print anywhere documents. However, a Printix Client still needs to be online on the printer’s network to release the documents.
Create role
- Open a new browser window and sign in to Google Cloud Platform (console.cloud.google.com), using your work account credentials.
- In Google Cloud Platform select the Navigation menu and select IAM & admin, and then Roles.
- On the Roles blade, select Create role.
- In Create role:
- In Title enter the name of the role. For example: printix storage
- In Role launch stage select General availability.
- Select Add permissions
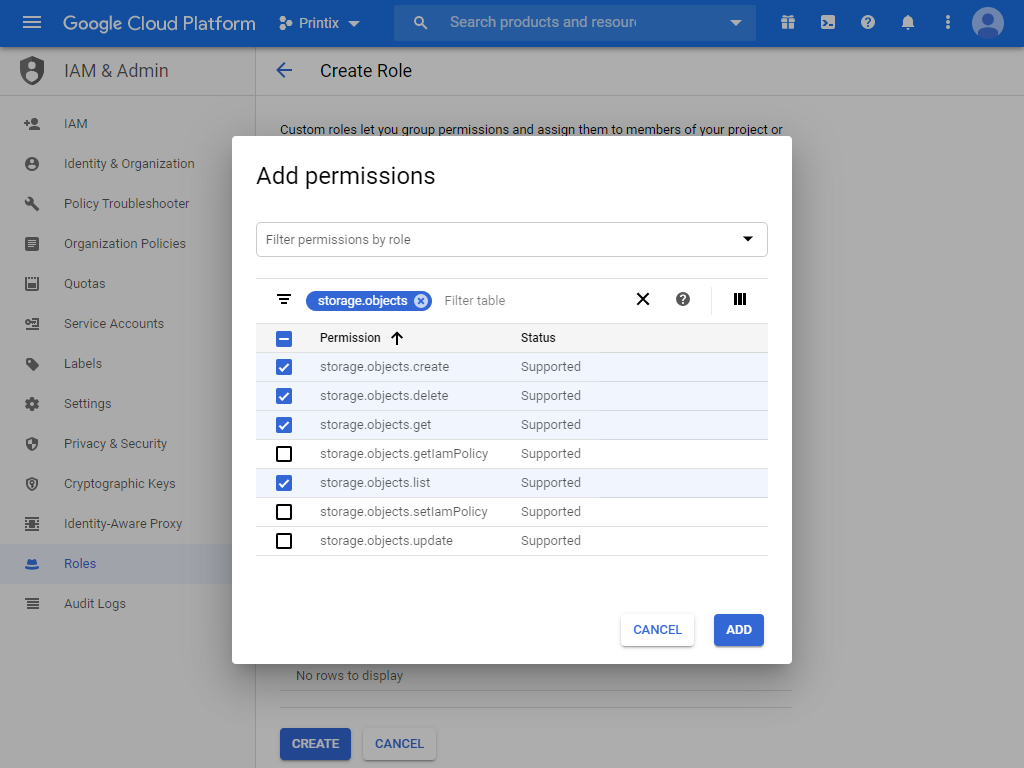
- In Filter type storage.objects and press Enter.
- Select the Permissions:
- storage.objects.create
- storage.objects.delete
- storage.objects.get
- storage.objects.list
- Select Add.
- Select Create.
Create service account
- In Google Cloud Platform, select the Navigation menu and select IAM & admin, and then Service accounts.
- On the Service accounts blade, select Create service account.
- In Service account details:
- In Service account name, enter the name of the service account. For example: printix
- Optionally, in Service account description, enter for example: printix cloud storage service account.
- Select Create and continue.
- In Grant this service account access to project:
- In Role, select the role you created in step 4 (printix storage).
- Select Continue.
- In Grant users access to this service account:
- Enter Service account users role.
- Enter Service account admins role.
- Select Done.
- Create a key as follows:
- Click on the created service account.
- Select the Keys tab.
- Select Create new key in the Add key list.
- Select JSON.
- Select Create.
The private key is saved to your computer and you need to paste the content of it in step 32.
- Select Done.
Create storage bucket
- In Google Cloud Platform, in the Navigation menu, select Cloud Storage.
- On the Browser blade, select Buckets.
- Select Create.
- Enter your bucket information and select Continue to complete each step:
- Specify a Name, subject to the bucket name requirements. Enter for example: printix-cloud-storage. You need to enter the name in step 31.
- As Default storage class for the bucket select Standard. Next, select a Location where the bucket data will be permanently stored.
- Leave Access control model at Set object-level and bucket-level permissions.
- Optionally in Advanced settings, you can add bucket labels, set a retention policy, and choose an encryption method. Leave Encryption at Google managed keys.
- Select Create.
- On the Bucket details pane, select Permissions.
- Select Add members.
- In New members add the service account you created in step 12 (Example: printix).
- Select roles. Scroll to Storage and then select Storage Object Creator.
- Select Add another role. Scroll to Storage and then select Storage Object Viewer.
- Select Save.
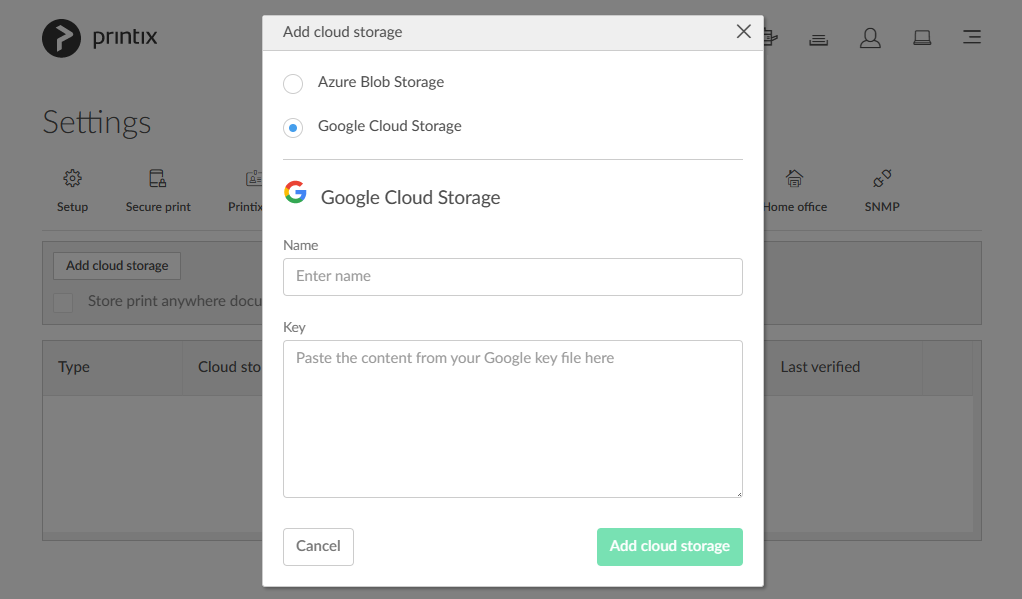
Add Google Cloud Storage
- In Printix Administrator select Menu
![]() , Settings
, Settings ![]()
- Select the Cloud storage
![]() tab.
tab. - Select Add cloud storage.
- Select Google Cloud Storage.
- In Name enter the bucket name you entered in step 23 (Example: printix-cloud-storage).
- In Key paste the content from your Google JSON Key File created in step 18.
- Select Add cloud storage.
- Optionally check type of pending documents you want to store.
See also:
Post your comment on this topic.