
To make Printix Client work with a managed image, you need to modify Windows Registry before you create the managed image.
- Install Printix Client, so it becomes part of the new managed image.
A managed image is typically used in connection with:- Azure Virtual Desktop
- Citrix
- Remote Desktop Services (RDS)
- VMware Horizon VDI
- Produce an image without the trace of previously registered computers.
- Must include user’s Printix settings in the Application Data roaming profile with Windows Registry setting StartAsVDI (step 8 below).
- Optionally control access to print queues with Windows Registry setting useGroupPermissions (step 9 below).
- Before you start to use the new image, you need to delete the computer in Printix Administrator. After a short time, the computers will register and appear in Printix Administrator.
Produce an image without the trace of previously registered computers (WSid)
If an image is produced after a user has signed in, and subsequently installed on another computer, then there will be an undesired condition where these computers will have the same WSId. This will result in the computers fighting for connection and they will try to update the same computer properties in the Printix Cloud. To resolve the issue you need follow the steps below to make an image, where no computer (WSid) has been registered.
- Open Task Manager
- Select the Details tab.
- Select PrintixClient.exe and select End task. Select End process.
- Select PrintixService.exe and select End task. Select End process.
- In Registry Editor browse to:
HKEY_LOCAL_MACHINE\SOFTWARE\
printix.net\Printix Client\
- Delete the Printix Client folders:
- \RT
- \WS
- Verify that these folders are still there:
- \CurrentVersion
- \Printers
- \Tenant
- \Users
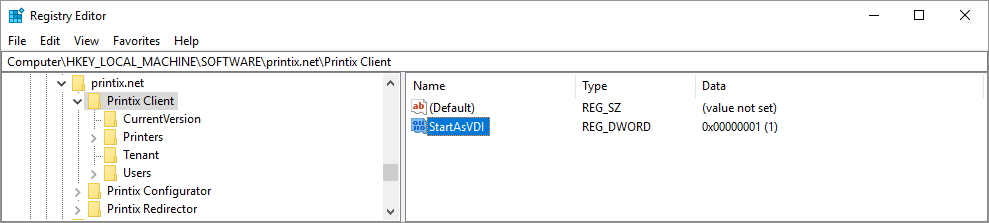
- In the Printix Client folder, add the DWORD value name StartAsVDI.
The StartAsVDI can take on these Decimal values (hex value in parenthesis):- 0 (0×00000000)
This is the default. Printix Client will update itself automatically. - 1 (0×00000001)
Printix Client will NOT update itself automatically. It will read and write the user’s Printix settings, including access tokens, in the user’s Application Data folder.- The path to the users application folder is based on
%APPDATA%.
- The path to the users application folder is based on
- 2 (0×00000002)
Printix Client will update itself automatically. It will read and write the user’s Printix settings, including access tokens, in the user’s Application Data folder.- The path to the users application folder is based on
%APPDATA%.
- The path to the users application folder is based on
- 999 (0×000003e7)
Printix Client will NOT update itself automatically. It will read and write the user’s Printix settings, including access tokens, in the user’s Application Data folder.- The path to the user’s application folder is based on
%USERPROFILE%and thenAppData\Roamingis appended.
- The path to the user’s application folder is based on
- 0 (0×00000000)
- In the Printix Client folder, add the DWORD value name useGroupPermissions.
It can take on these Decimal values (hex value in parenthesis):- 0 (0×00000000)
This is the default. Printix Client will make all installed print queues available to the signed in user. - 1 (0×00000001)
Printix Client will look at the users’ group membership and only make print queues with Exclusive access available to the signed in user. This is done by setting the security permissions on the print queues accordingly. The groups MUST be in both Active Directory and Microsoft Entra ID.
- 0 (0×00000000)
- Produce the image.
How to see the value of APPDATA
- Open a command prompt and type:
echo %APPDATA%- Normally this will give the result:
C:\Users\ username \AppData\Roaming
Example: C:\Users\John\AppData\Roaming - If the AppData folder is redirected this will give the result:
\\ servername \ folder Redirect$\ username \Application Data
Example: \\myserver.acme.com\myfolderRedirect$\John\Application Data
- Normally this will give the result:
The below is the example of the Printix relevant path and subfolders that must be included in the roaming profile.
- %APPDATA%\printix
Example: \\myserver.acme.com\myfolderRedirect$\John\Application Data\printix
Post your comment on this topic.