
In order to install Printix Go, a Sign in profile and a Go configuration must be created and assigned. Also, it must be a Printix Go supported printer.
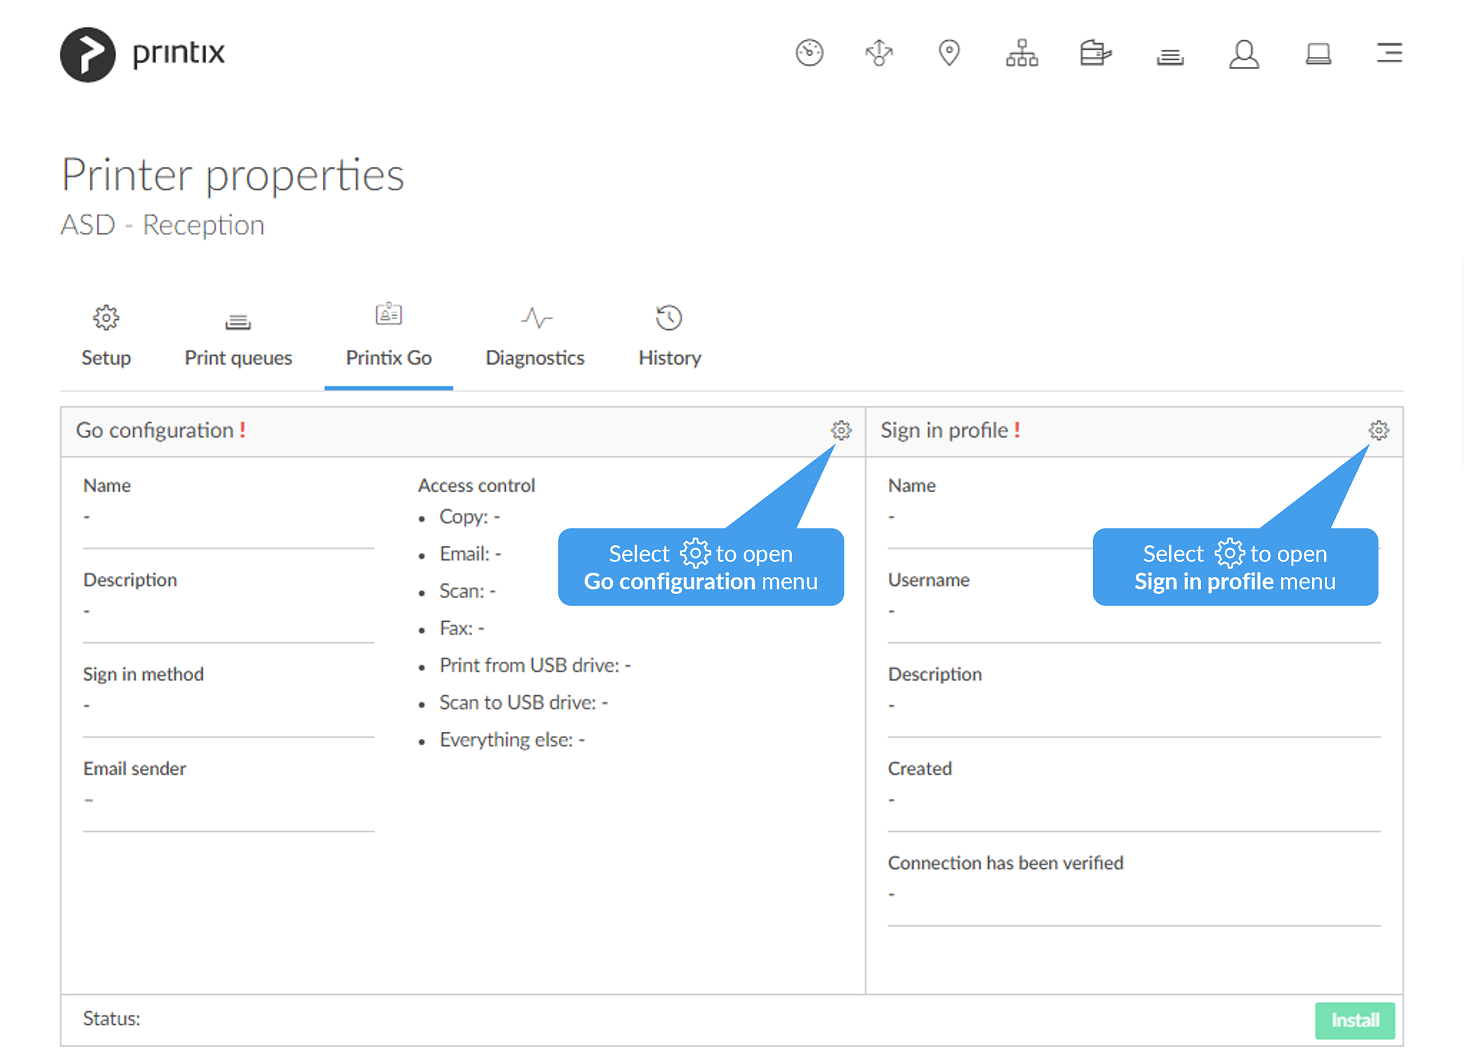
- Open Printer properties and select the Printix Go
![]() tab.
tab. - Select Sign in profile setup
![]() to open Sign in profile menu.
to open Sign in profile menu. - Select Create sign in profile. If you have an existing sign in profile that can be used, then select Assign sign in profile.
- In Name, type a descriptive name for the sign in profile.
- On Kyocera, you can enter any username and password, because sign in credentials are created with KYOCERA Net Viewer. However, assigning a profile is necessary to install Printix Go on the printer.
- In Username, type the username of an administrator account that can access the printer’s web pages. The username can not be blank.
- In Password, type the password of an administrator account that can access the printer’s web pages. The password can not be blank.
- In Description, type an optional description for the sign in profile.
- In Add SNMP configuration, select an SNMPv1 configuration that matches what is configured on the printer.
- On Xerox, you MUST select an SNMP configuration, AND the Set Community Name specified in the selected SNMPv1 configuration MUST match the Community Name Read/Write configured as part of SNMPv1/v2 on the printer.
- If you do not want to assign the created sign in profile now, then uncheck Assign to printer.
- In Name, type a descriptive name for the sign in profile.
- Select Save.
- Select Verify sign in profile. The printer must be online.
- Select Go configuration setup
![]() to open Go configuration menu.
to open Go configuration menu. - Select Create Go configuration. If you have an existing Go configuration that can be used, then select Assign Go configuration.
- In Name, type a descriptive name for the Go configuration.
- In Description, type an optional description for the Go configuration.
- In Sign in method, optionally, change it from Select automatically to the method you want.
- In Access control, optionally, check the printer functions that will require sign in.
- On Konica Minolta, all functions are considered locked as sign in is required to use any function anyway.
- On Kyocera, users can sign in as guest to use functions not locked by Access control.
- On Ricoh, users can sign in as guest to use functions not locked by Access control.
- In Email sender, optionally, type a default sender email address and this will be used as the sender rather than the email address of the signed in user doing a scan to email.
- If you do not want to assign the created Go configuration now, then uncheck Assign to printer.
- Select Save.
- Select Install to install Printix Go on the printer.
It can take up to a minute before the Printix Print icon appears on the touchscreen control panel of the printer.- On Epson, the network interface restarts, leaving the printer disconnected from the network for about 1 minute.
- On Fujifilm, the printer restarts itself twice during installation.
- On HP, select Reset on the printer if the Printix Print icon does not appear.
- On HP Workpath, first install Printix Go through the HP Command Center, then install Printix Go through the Printix Administrator to configure it to work with your Printix Home.
- On Kyocera, first install Printix Go through the KYOCERA Net Viewer, then install Printix Go through the Printix Administrator to configure it to work with your Printix Home.
- On Lexmark, you need to manually restart the printer after installation. Otherwise, you cannot use the Printix application on the printer.
- On Ricoh, a computer with Printix Client for Windows must be online on the printer’s network during the installation, update, or uninstallation of Printix Go Ricoh.
- On Ricoh, the Status changes to Installing as the installation takes 10 – 25 minutes (printer restarts 2 times). If the installation fails, the status will change to Failed. Otherwise, it will change to Installed. See also: Printix Go troubleshooting – Ricoh.
- On Ricoh, the inactivity timeout must be changed after installation.
- On Xerox VersaLink, you need to manually restart the printer after installation. Otherwise, you will get the message Could not log in.
- Optionally, refresh the page to verify that the Status changed from Unknown to Installing or Installed.
It can take up to a minute for the update to finish, so only refresh the page after enough time passed.
If the status becomes Failed, please check if updating to the latest printer firmware version allows installation.
See also:
Sign in profile
- Name
Descriptive name of the sign in profile.
- Description
Optional description of the sign in profile.
- Username
The username of an administrator account that can access the printer’s web pages. The username can not be blank.
- Password
The password of an administrator account that can access the printer’s web pages. The password can not be blank.
- SNMP configuration
On Xerox, the Set Community Name specified in the selected SNMPv1 configuration MUST match that configured on the printer.
Printer administrator default username and password
Table with default username and password.
| Vendor | Username | Password | Notes |
| Epson | – | – | No default, but a username and password MUST be set. |
| Fujifilm | 11111 | x-admin | A username and password MUST be set. |
| HP | – | – | No default, but a username and password MUST be set. |
| HP Workpath | – | – | No default, but a username and password MUST be set. |
| Konica Minolta | Contact your Konica Minolta technician to get the details (model dependent). A username and password MUST be set. | ||
| Kyocera | – | – | A username and password MUST be set. |
| Lexmark | – | – | No default, but a username and password MUST be set. |
| Ricoh | – | – | No default, but a username and password MUST be set. |
| Xerox | Contact your Xerox technician to get the details. A username and password MUST be set. |
Note:
- For Ricoh SOP printers Generation 2, web server password must be the default password.
Go configuration
- Name
Descriptive name of the configuration.
- Description
Optional description of the configuration.
- Sign in method
How will users sign in at the printer.- Select automatically
Maps to Card if a card reader is connected to the printer. Otherwise, it maps to ID code. Mapping changes within 10 seconds after the card reader is either connected or disconnection. If it does not change, a restart of the printer may be required. See also: Printix Go Konica Minolta card reader limitations - Card
- ID code
- Card or ID code
- Select automatically
- Access control
What printer functions will require sign in.- Copy
- Scan
- On Ricoh, if Scan is locked but Email and/or Scan to USB Drive are unlocked, guests cannot use the Email and Scan to USB Drive functions. Conversely, if Scan is unlocked but Email and/or Scan to USB Drive are are locked, guests can use the Email and Scan to USB Drive functions.
- Fax
- Print from USB Drive allows user to print from a flash memory or mass storage device.
- Scan to USB Drive allows user to scan to a flash memory or mass storage device.
- Everything else. Check this if you want Printix Go to lock access to other functions (besides the above ones). Checking this will also lock access to third-party applications. Please submit a support request if there is a particular application you want Printix Go to control access to.
- Note: On Konica Minolta, all functions are considered locked as sign in is required to use any function anyway. On Kyocera, users can sign in as guest to use functions not locked by Access control. On Ricoh, users can sign in as guest to use functions not locked by Access control.
- Email sender
Leave this blank and when using a printer’s Email function the From field will be prefilled with the email address of the signed in user. However, this can cause some SMTP servers to reject the sending of the scanned documents. In this case you can type a default sender email address in the Email sender field and this will be used as the sender rather than the email address of the signed in user.
Printer default sender email address
Table with the corresponding parameter names typically holds the value for the default sender email address.
| Vendor | Email sender | Notes |
| Epson | Sender’s Email Address | – |
| Fujifilm | E-mail Address | – |
| HP | Default From | – |
| HP Workpath | Default From | – |
| Konica Minolta | Device Mail Address | Alternatively, Admin E-mail Address |
| Kyocera | Sender’s Email Address | Alternatively, the address of a user specified on the printer’s web page |
| Lexmark | Reply address | – |
| Ricoh | Administrator Email Address | – |
| Xerox | Device Email | – |
Post your comment on this topic.