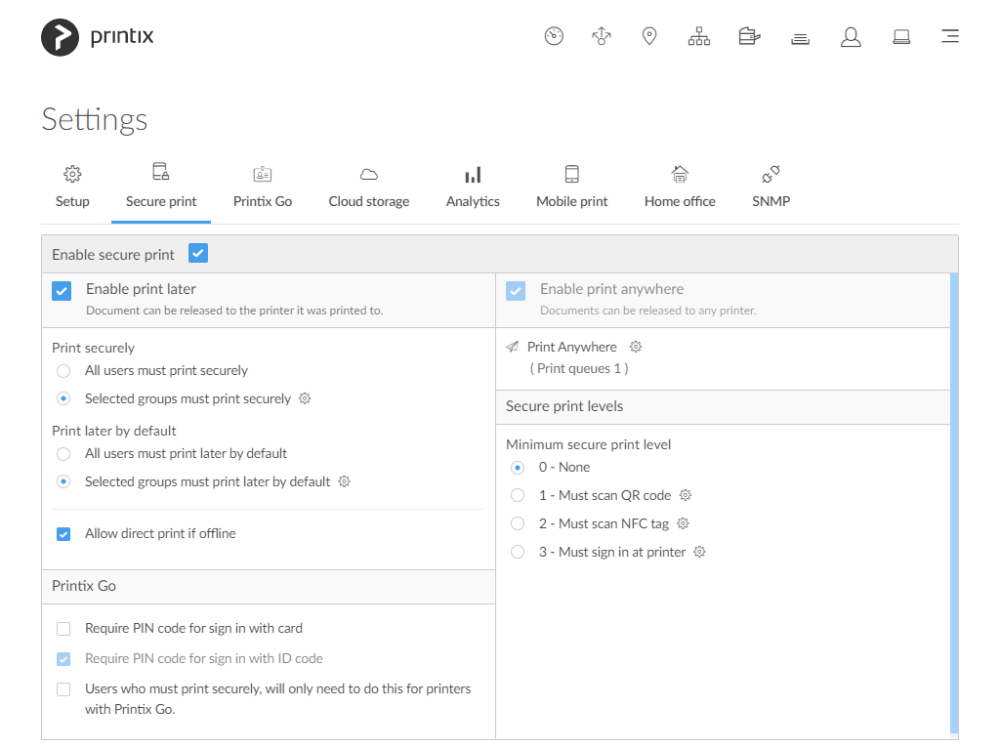
On the Secure print tab, you can enable and configure the print methods: Print later and Print anywhere.
To get here:
- Select Menu
, Settings
.
- Select the Secure print
tab.
Secure print
- Enable secure print
Users can choose to print securely and wait to release documents until they are ready to collect the documents.
Print later
- Enable print later
Check this to allow users to print confidential documents and control finishing options.- Document can be released to the printer it was printed to.
- Document is processed using the matching print driver, with full control of finishing options, for example.
- All users must print securely
Check this so all users must release their documents and can not print directly.- Can also be set for selected users via group membership.
- Print queues can be Exempt from secure print.
- Selected groups must print securely
Check this to select the groups who’s users must print securely.- Select Setup
to open Groups
menu:
- Select Groups to see currently selected groups.
- Select Add groups to add groups.
- Select Remove groups to remove groups.
- Print queues can be Exempt from secure print.
- Select Setup
- All users must print later by default
Check this if all users should have print later as the preferred print method.- In the event a user want to submit a document directly to a printer, the user must deselect print later at every print.
- Can also be set for selected users via group membership.
- Print queues can be Exempt from secure print.
- Selected groups must print later by default
Check this to select the groups who’s users will have print later as the preferred print method.- Select Setup
to open Groups
menu:
- Select Groups to see currently selected groups.
- Select Add groups to add groups.
- Select Remove groups to remove groups.
- Print queues can be Exempt from secure print.
- Select Setup
- Allow direct print if offline
If checked, users, who otherwise must print later, can print directly while there is no internet connection to the Printix Cloud. This is provided the computer and printer are on the same network, that is, the document does not need to be printed via the cloud. On the computer, a yellow dot is shown on the Printix Client iconwhen the Printix Client is in the state Connection failed and cannot register documents with Printix. The Select print method dialog will pop up and allow the user to select Print to submit the document directly to the printer. User and usage data is still collected and then sent to the Printix Cloud once the internet connection is back. Print Anywhere does not work while there is no Internet connection to the Printix Cloud.
Print anywhere
- Enable print anywhere
Check this to allow users to print confidential documents.- Document can be released to any Printix (ASD, BNM, …) printer.
- Document is sent as PDF, except if the printer does not support PDF printing or Process PDF/XPS is checked. In this case, the PDF document is processed using a matching print driver.
- Print anywhere does not work while there is no internet connection to the Printix Cloud.
- Select Setup
to open Print Anywhere
menu:
- Select Print queues to see available print anywhere print queues.
- Select Create print queue to create a print anywhere print queue.
- In the Create print queue dialog enter Print queue name.
- Cannot contain the characters ‘\’ and ‘,’
- Must be unique for the printer. Uppercase and lowercase letters are treated the same.
- Optionally uncheck Active to allow administrators (you) to test printing before allowing users to add the print queue.
- Select Save.
Secure print levels
- Minimum secure print level
The global minimum secure print level. Default is 0 (see table). A higher secure print level can be set for selected users via group membership.- 0 – None
- 1 – Must scan QR code
- 2 – Must scan NFC tag
- 3 – Must sign in at printer
- Secure print level groups
- Select Setup
to open Groups
menu:
- Select Groups to see currently selected groups.
- Select Add groups to add groups.
- Select Remove groups to remove groups.
- Select Setup
| Level | Printer ID method | Printix App | Remarks |
|---|---|---|---|
| 0 | – | Native and Web |
|
| 1 | QR code | Native |
|
| 2 | NFC tag | Native |
|
| 3 | Card or ID code | – |
|
Printix Go
- Require PIN code for sign in with card
This is unchecked by default. Check this if users are to both present card and enter PIN code to sign in to Printix Go enabled printers.
- Require PIN code for sign in with ID code
This is checked by default. If users are to only enter ID code to sign in to Printix Go enabled printers, you must contact us so we can change the setting for you. This is for security reasons.
- Users who must print securely, will only need to do this for printers with Printix Go
This is unchecked by default. Check this so the affected users must release documents they submit to printers with Printix Go. These users are thereby exempt from using Printix App on their phone to release documents when printing directly to other printers.


Post your comment on this topic.